
These Red Velvet Pan-Banging Cookies are a variation of both the Pan-Banging Sugar Cookie and the Pan-Banging Ginger Molasses Cookie with Rum Butter Glaze, which are all also off-shoots of my Pan-Banging Chocolate Chip Cookies. These delicious cookies have buttery, rippled edges and a chewy center as a result of using the pan-banging cookie technique.
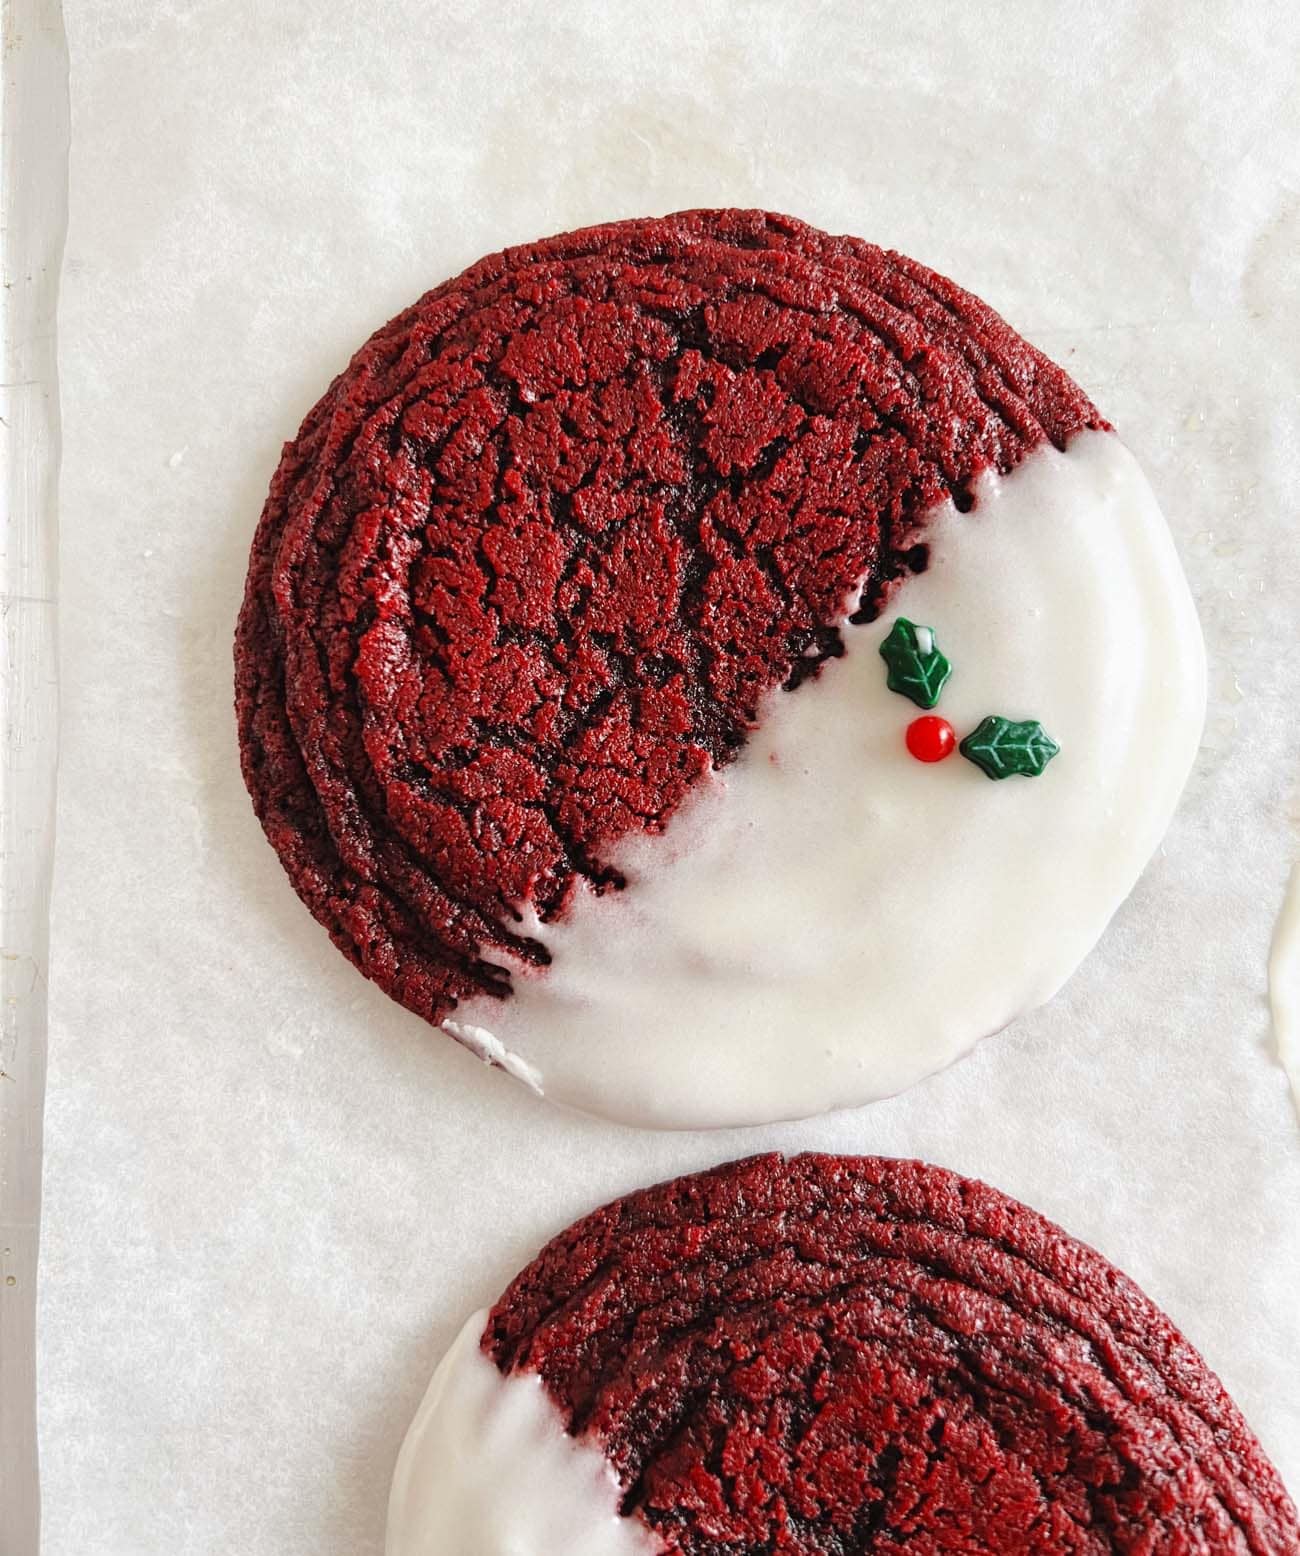
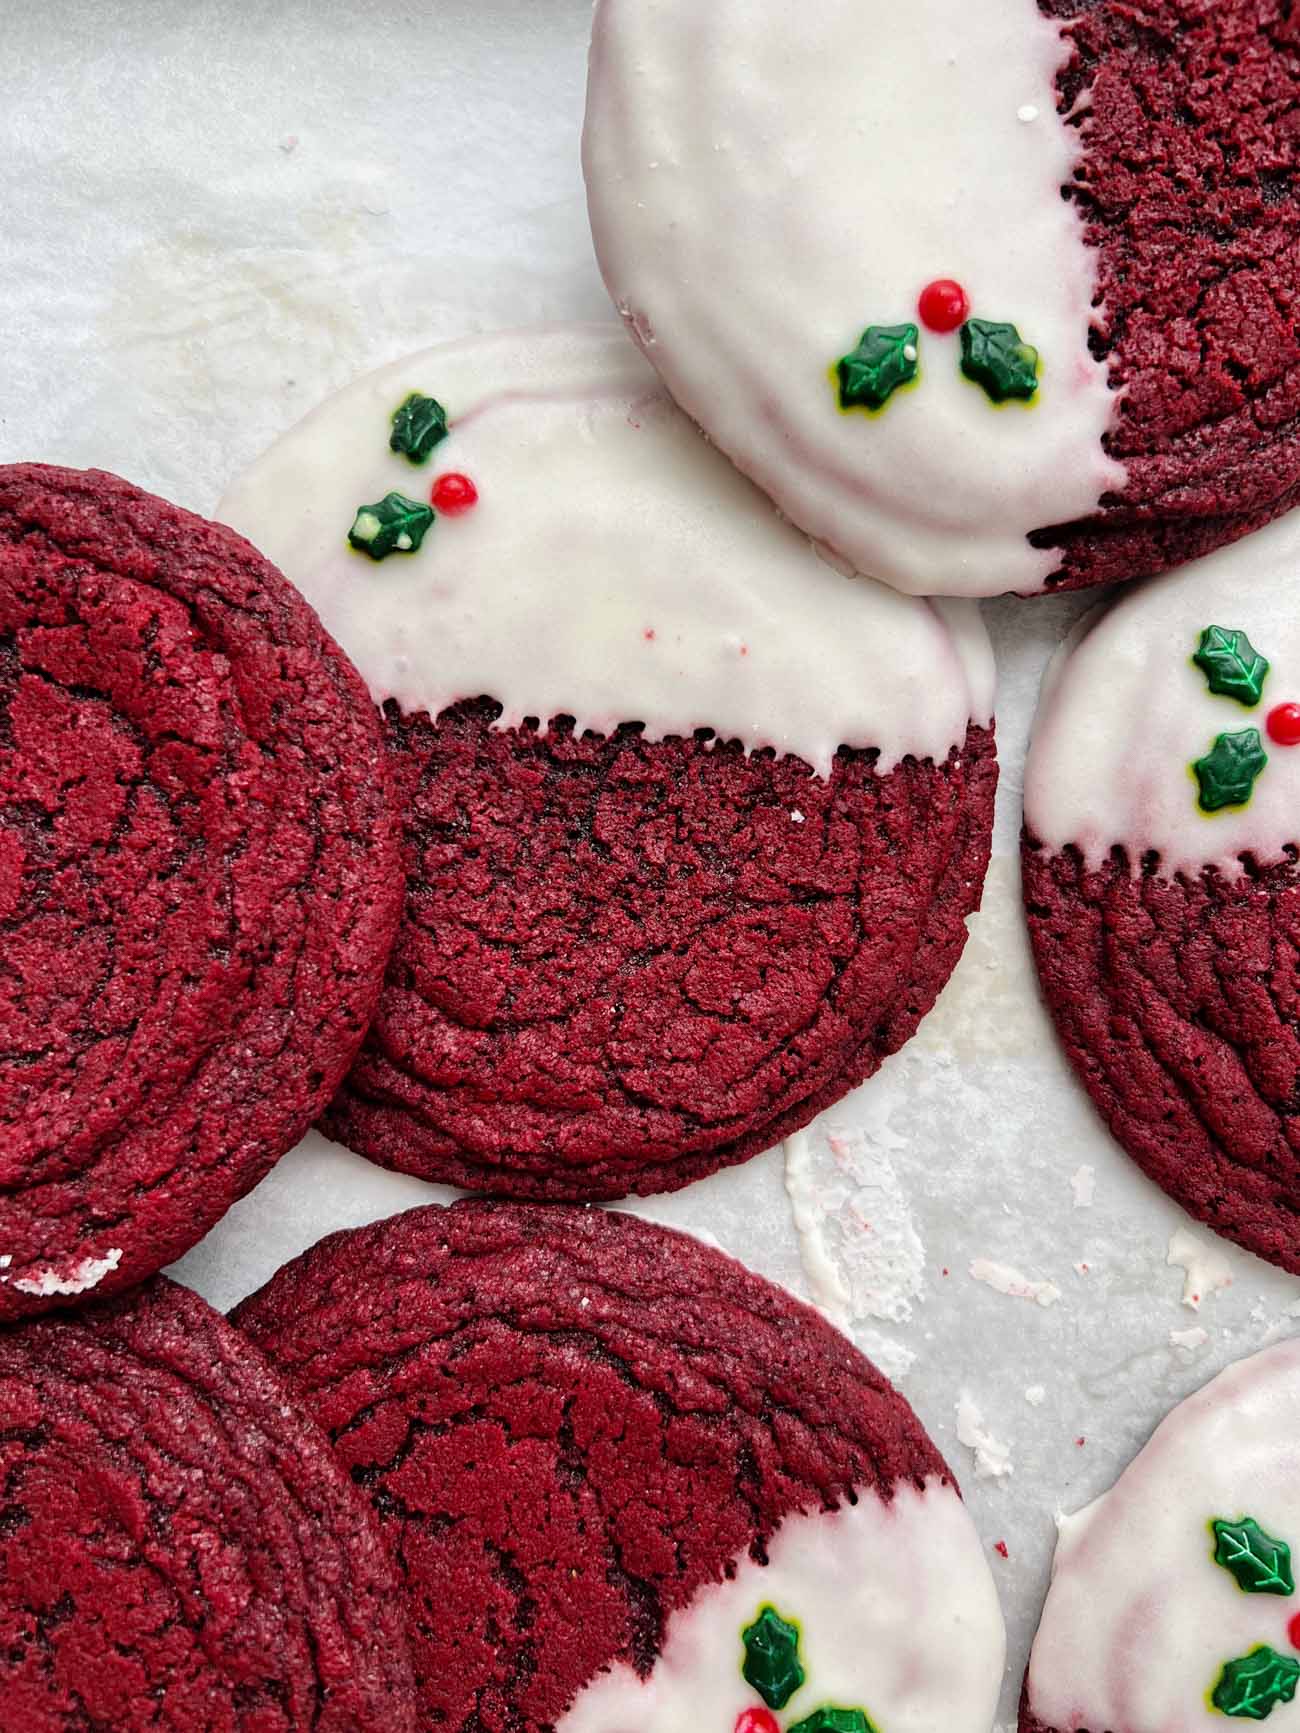
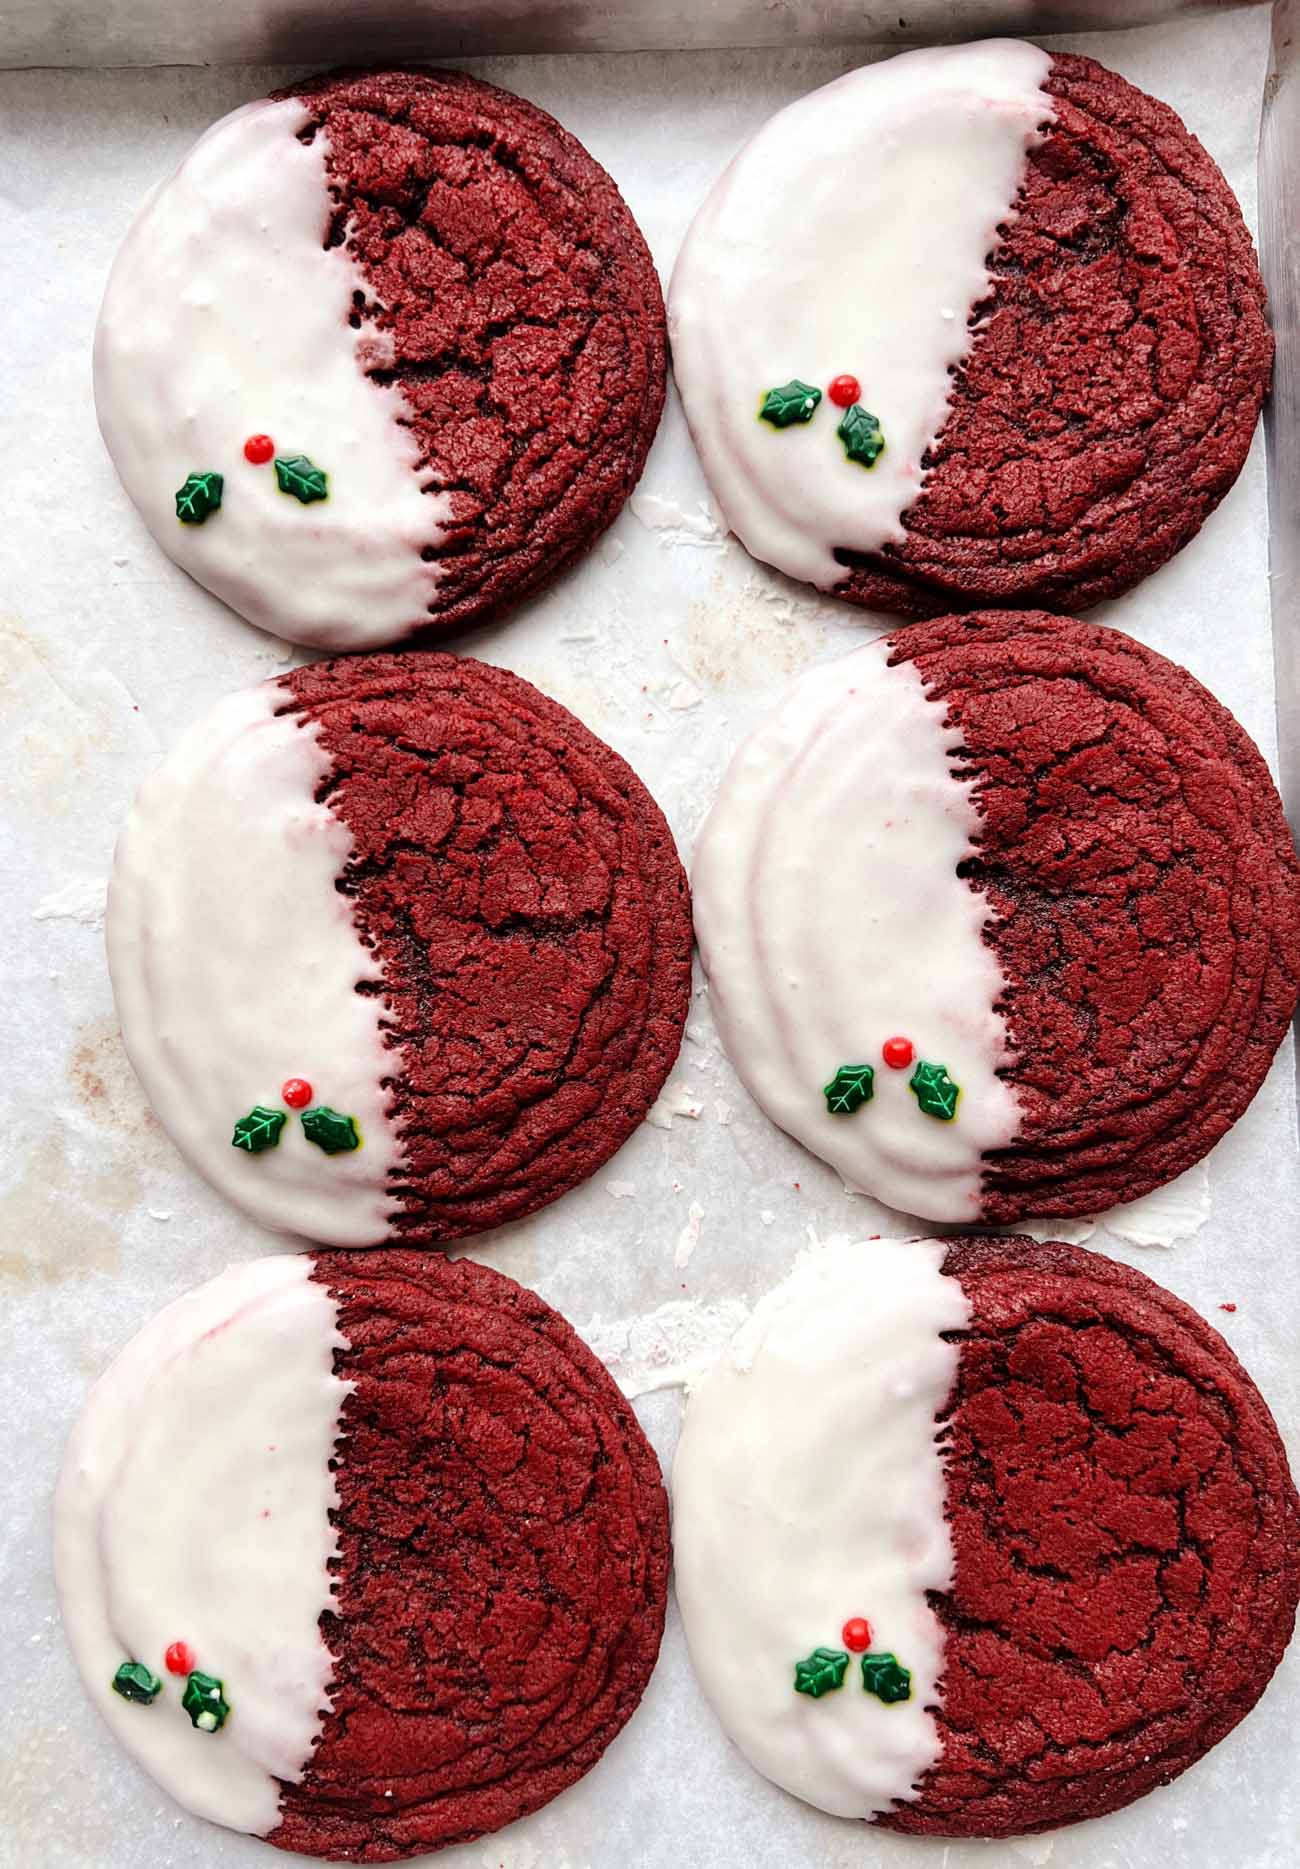
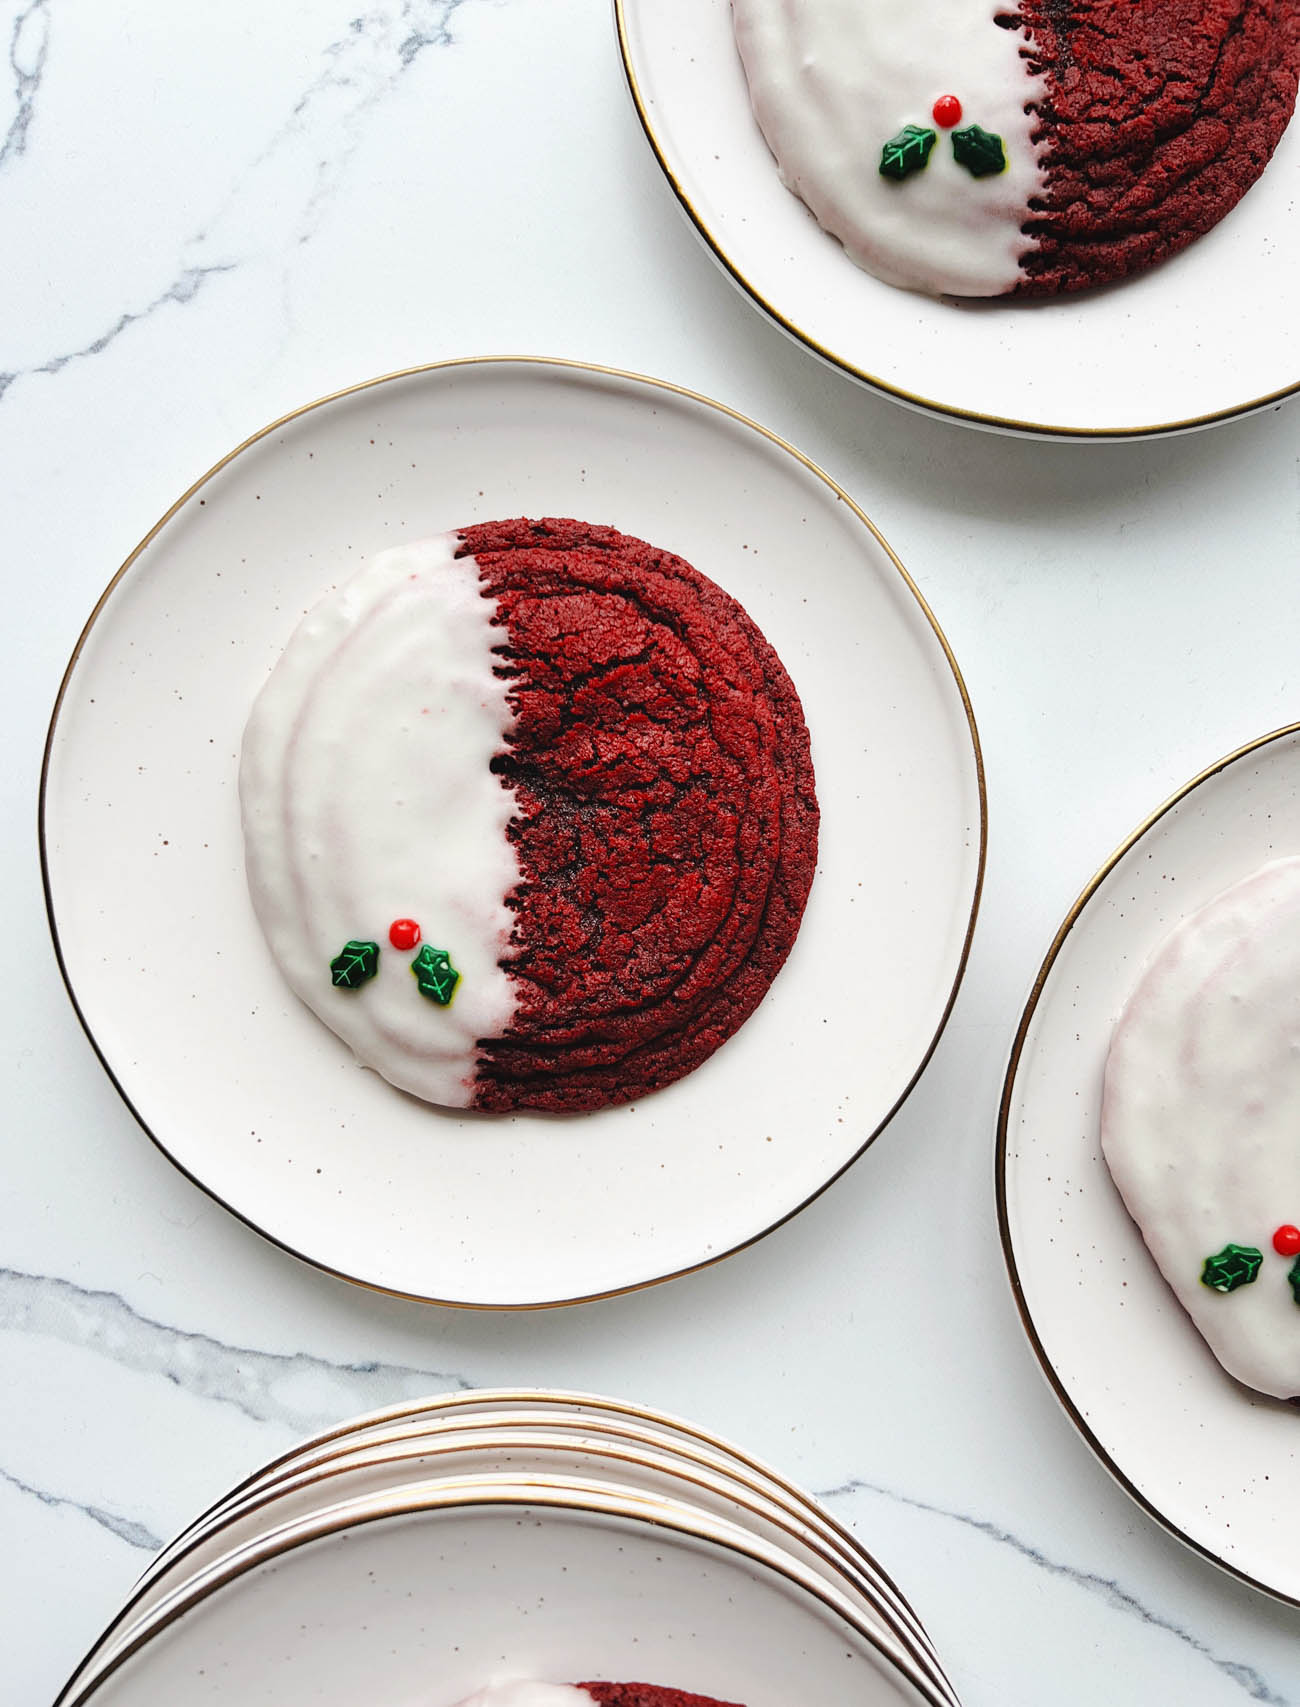
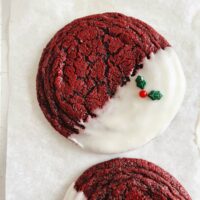
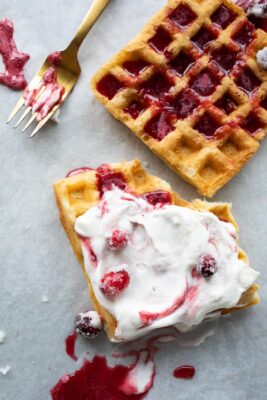
They also mimic the famous red velvet cake (like my Red Velvet Cream Cheese Sugar Cookies), with both red food coloring and a little bit of cocoa powder in the dough to create the beautiful burgundy hue, and a partial dip in cream cheese icing to complete the classic “red velvet” flavor combination.
These cookies are perfect for the holidays, and have made it onto my Top 24 Holiday Cookie recipes list.
What Are Pan-Banging Cookies?
Bakers tapping their cookie pans in the oven isn’t new, of course, but the pan-banging technique I use here is unique in that the pan is tapped in the oven every few minutes, creating ripples on the edge of the cookie. This creates two textures in the cookie: a crisp outer edge, and a soft, gooey center. I have a whole chapter of these recipes in my 100 Cookies cookbook.
Just like the Pan-Banging Chocolate Chip Cookies, the center needs to be under baked. The cookies will still cook on the pan after you take them out of the oven, so the centers won’t be raw.
Ingredients for Red Velvet Pan-Banging Cookies:
Red food coloring and cocoa powder are really the only two extra ingredients that elevate these cookies to “red velvet”. A gel based food coloring will create a brighter color than a liquid one, and I like to use a Dutch-processed cocoa powder; it mixes with the red to make a lovely, Merlot-esque shade.

Measuring Flour for Baking Cookies:
*Throughout my recipes posted on this website, 1 cup of flour equals 142g. Please note that 1 cup of flour can range anywhere from 120g to 142g, depending on the baker or website. I found that after weighting many cups of flour and averaging the total, mine always ended up around this number. Weighing your flour instead of using cup measurements is the surest way to get the result I intended when developing the recipe.
Different brands of flour have varying levels of protein, ranging from low to high, which can result in very different outcomes when baking. I’ve found Gold Medal all-purpose unbleached flour to be the best option for many of my recipes; I use it in all the baked goods that don’t use yeast.
Do I have to bang the pan outside the oven?
No, you don’t! As stated in the recipe, I lift the side of the baking sheet up about 4 in [10 cm] and gently let it drop down against the oven rack, so the edges of the cookies set and the inside falls back down.
Red Velvet Pan-Banging Cookies
Ingredients
- 2 cups [284 g] all-purpose flour
- 1 teaspoon baking soda
- 3/4 teaspoon fine salt
- 1/2 teaspoon cream of tartar
- 1 cup [2 sticks or 227 g] unsalted butter, at room temperature
- 1 1/2 cups [300 g] granulated sugar
- 1 large egg
- 2 tablespoons Dutch-process cocoa powder
- 1 tablespoon red food coloring (I prefer gel-based)
- 1 tablespoon pure vanilla extract
For the icing
- 3 oz [85 g] cream cheese, soft
- 1 tablespoon unsalted butter, melted
- 2 to 4 tablespoons water
- 1/2 teaspoon pure vanilla extract
- Pinch salt
- 1 to 1 1/2 cups [120 to 180 g] confectioners' sugar
- Holly sprinkles
Equipment
Instructions
- Adjust an oven rack to the middle of the oven. Preheat the oven to 350F [180C]. Line three sheet pans with aluminum foil or parchment paper (see note).
- In a small bowl, whisk together the flour, baking soda, salt, and cream of tartar.
- In the bowl of a stand mixer fitted with a paddle, beat the butter on medium speed until creamy, about 1 minute. Add the granulated sugar and beat on medium speed until light and fluffy, 2 to 3 minutes. Add the egg and mix on low speed to combine. Add the cocoa powder, red food coloring, and vanilla, and mix again on low until combined. Use a spatula to scrape down the sides as needed and completely combine the food coloring into the batter. Add the flour mixture and mix on low speed until completely combined.
- Form the dough into 3 oz [85 g] balls [1/4 cup]. Place 4 cookies an equal distance apart on the sheet pans. Bake the cookies one pan at a time. Bake until the dough balls have spread out but are puffed slightly in the center, 8 minutes. Lift one side of the sheet pan up about 4 in [10 cm] and gently let it drop down against the oven rack, so the edges of the cookies set and the center falls back down. After the cookies puff up again in 2 minutes, repeat lifting and dropping the pan. Repeat a few more times to create ridges around the edge of the cookie. Bake for 13 to 16 minutes total, until the cookies have spread out and the edges are set and golden but the centers are not fully cooked.
- Transfer the pan to a wire rack. Let the cookies cool for 10 minutes, then move them to a wire rack to cool completely before icing them.
For the icing
- Melt the butter in a medium bowl. Add the cream cheese, 2 tablespoons of water, vanilla, and salt, and whisk to combine. Add 1 cup [120 g] of the confectioners' sugar and mix with a spatula to combine. Add more sugar as needed, until the desire consistency is reached. You want the icing to be thick but not too thick – it should be thin enough to cling to the surface when you dip the cookie into it. If your icing is too thick, you can add more water as needed to thin it out.
- To assemble: dip half of a cooled cookie into the icing. Decorate with holly sprinkles or other decoration if desired. Let the icing set before serving.
39 Comments
Courtney
Tuesday, December 16, 2025 at 5:20 pmThese came out flat and gooey and tasted bland. I think the commenter who mentioned baking powder vs. baking soda is correct. Didn’t try the frosting as the cookies are inedible.
Courtney
Wednesday, December 3, 2025 at 2:37 pmI’m not really the type of person to leave recipe reviews, but I have a couple thoughts on this one. The icing makes the cookies soggy if they sit so you really should only make these if you’re planning to eat them that day. Also only icing half of what is an enormously sized cookie makes it so that 1/2 of the cookie is less enjoyable so I would say to make these very small maybe two bite cookies if you’re only going to ice half of them. These do not keep well at all and become very grainy And honestly, they did not really taste that good even fresh. This is probably the only cookie I’ve ever thrown away about a third of the batch because I just wasn’t excited to eat them. In my opinion. Bake goods really need to be worthy of the time and calories and this just did not take those boxes for me. I would like to add that I discovered this recipe via a Pinterest post that had this included among a bunch of cookies for a cookie box which I don’t think was made by the recipe author reading over the other comments. It seems like a lot of people were hoping to include these in a cookie box and they would be completely unsuitable for that due to the fact that the icing is very wet and falls off the cookies and they get soggy and would just make a mess of your box. The pan banging technique is interesting and the cookies did have a nice chewiness if eaten right away.
Mel
Monday, November 10, 2025 at 9:19 pmMy cookie dough came out brown. I used 1 tablespoon red food gel & 2 tbs cocoa powder like the recipe said. ??
Cheryl
Saturday, August 30, 2025 at 1:33 pmAbsolutely fantastic! I wanted to get a jump start on my holiday cookie box & tried these out, what a fabulous cookie! Followed recipe exactly. I didn’t do the icing, to be honest the cookie is great wo it& i am exhausted from baking all weekend. I could see where the icing would be beautiful for the holidays though. Thanku for a great recipe!
Cassie M
Wednesday, February 19, 2025 at 8:19 pmHi!! I was getting ready to make these and noticed the recipe calls for baking soda with Dutch-process cocoa powder. I’ve always heard you’re supposed to use baking powder with Dutch-process cocoa and not baking soda because the cocoa is not acidic and will not react to soda. Is this intentional because of the pan banging? Just curious. Thank you!
Catherine S
Saturday, December 21, 2024 at 11:15 amI made these last week to share with friends so I made them smaller. They were a big hot – even though the icing wasn’t fully set. Love the color. I was hoping they would be more chewy than they were, but still delicious. For the icing, I started with the minimum amount of icing sugar but the color wasn’t white so I added icing sugar to get the full amount in the recipe and that made the icing white.
Autumn
Thursday, December 19, 2024 at 10:36 amFantastic! A fabulous addition to this year’s cookie boxes
Justin
Wednesday, December 18, 2024 at 9:03 pmFine salt – kosher or sea? Presuming fine kosher salt. Just want to confirm before I quadruple this batch. Thanks!
C
Sunday, December 15, 2024 at 9:34 amWanted to love these but the icing ruined them, mine never set up even after multiple hours on the counter, they were so gooey and inedible. Bummed as they were going to be a nice addition to holiday boxes.
Barb
Tuesday, December 10, 2024 at 8:32 pmThese came out beautifully…I made mine much smaller for cookie boxes but the pan banging still made a lovely texture. The cookies are beautiful and will definitely be on my must haves for Christmas cookies from here on out! Thank you.
Stephanie
Tuesday, December 10, 2024 at 1:20 pmDo we have to refrigerate the cookie once the icing is on since there is cream cheese? i want to put this in a cookie box, but i need to be sure it’s safe. thanks
Julie Chien
Saturday, December 7, 2024 at 11:31 pmdelicious
Erin
Saturday, December 7, 2024 at 9:03 amBecause there is cream cheese in the icing, should these be refrigerated? I want to make I’m handling food safely, but I also didn’t want them to become too moist in the refrigerator.
Cindy
Wednesday, November 20, 2024 at 10:03 amCan you make the cookie balls and freeze them to bake later? If so how long can you freeze them for and should you flash freeze each ball separately then put them in a freezer bag?
Thank you.
Sarah Kieffer
Saturday, December 7, 2024 at 12:38 pmHi Cindy – Yes, you can freeze them! And I do recommend flash freezing separately first. They should hold in your freezer for 2 weeks, and you may need to add a minute or two to the baking time.
Alphabet
Saturday, January 13, 2024 at 4:56 amSOOOOOOO good! I’ve made so many of cookies and all have been amazing. These did not disappoint at all!
Shae
Friday, December 22, 2023 at 11:36 pmHi! How would you store these?
DAWN
Friday, December 22, 2023 at 2:15 pmHi Sarah,
I had an issue with my glaze and I’m wondering what I did wrong. The glaze isn’t as white as the glaze on your cookie. Mine is more transparent and has taken on the brown hue of the vanilla extract. I tripled the recipe to share at a holiday party so I was wondering if I should just omit the vanilla altogether or just work in batches instead of making 1 large batch? Any advise on how to make the pretty white glaze shown on your cookie?
Laura
Tuesday, December 19, 2023 at 7:30 pmHi. I made these and for me, it’s just too much food coloring. I used gel based. Did you put white food coloring in your glaze? Mine was pretty transparent.
Nikki
Tuesday, December 19, 2023 at 8:57 amHi! Am I able to make the dough a day ahead of when I need them? Trying to save myself some time the day of my party!
Sarah Kieffer
Tuesday, December 19, 2023 at 9:02 amYep!
Allegra Fried
Monday, December 18, 2023 at 10:20 pmHi!! These look amazing. Any suggestions for putting these into a holiday cookie box? I want to make them but I’m worried about the icing when adding them to the box (stacking and with other cookies)? Thanks!
Sarah Kieffer
Tuesday, December 19, 2023 at 7:59 amHi! I wouldn’t recommend stacking; leaning is the best option.
Leticia
Monday, December 18, 2023 at 3:41 pmDo these freeze well?
Meg D'Incecco
Monday, December 18, 2023 at 10:53 amThese were a huge hit at the cookie exchange I went to last night. I made them much smaller – .5 oz – and doubled the recipe so I would have plenty to share and they turned out super delicious. I made a few full-sized ones for my family and both were fantastic. If you want to transport them, give yourself a few hours for the icing to set and don’t stack them too aggressively.
So delicious and festive, thanks Sarah!
Sara
Friday, December 15, 2023 at 9:13 pmI rarely make chocolate desserts bc my bf doesn’t like chocolate but he will eat red velvet (I haven’t told him it’s chocolate lol). These are such a delicious combo of crispy and chewy, I get to have my chocolate and he’s already had half the batch and is none the wiser. Also, I chilled the dough for about 30-45 min and used maybe half a tbsp of regular red food dye and the color is a lovely deep red
Sarah Kieffer
Saturday, December 16, 2023 at 11:55 amSo glad you enjoyed them!
Jen
Monday, December 11, 2023 at 11:13 pmThese were crazy delicious! I made them gluten free and my (non GF) mom said they were the best cookies she’d ever had in her life.
My frosting never really “set up” though — hours later it was still pretty gooey (not even in a thick layer). Did I do something wrong? I’d like to take these to Xmas dinner but they won’t travel well if they’re gooey.
Love your recipes!!
Sarah Kieffer
Tuesday, December 12, 2023 at 8:34 amHi Jen – I’m so glad you liked the cookies! As for the icing, it could have not set due to several factors. Your kitchen may be too humid, there may be too much water in the icing (which could happen if you made it really thin), or if you put them in the refrigerator before it was fully dried. Because of the butter and water in the icing, it will be slightly tender even when set, so I sort of “lean” them for traveling/serving (vs stacking) so that the icing part of the cookie is exposed.
Cassie
Sunday, December 10, 2023 at 5:13 pmI don’t have a stand mixer: will a hand mixer work the same??
Sarah Kieffer
Monday, December 11, 2023 at 2:02 pmHi Cassie – it should work just fine! It might take a little bit longer to cream the butter and sugar, and you may have to stir the flour in by hand towards the end.
Stefanie
Saturday, December 9, 2023 at 10:34 pmThese are delicious. Easy to make. My husband doesn’t really care for chocolate but loved these. They won’t last long.
Beverly
Friday, December 8, 2023 at 10:33 amCan you use the red emulsion?
Sarah Kieffer
Friday, December 8, 2023 at 10:47 amyes, this red velvet emulsion works great!
Yolanda
Monday, December 11, 2023 at 12:26 amHow much red velvet emulsion should we use? Also, do I need to adjust anything else if I do the emulsion instead of the food coloring? I love the pan banging sugar cookies and the chocolate chip version! Can’t wait to try these!
Sarah Kieffer
Monday, December 11, 2023 at 8:24 amHi! Same amount of red velvet emulsion!
Beverly
Tuesday, December 12, 2023 at 1:35 pmCould you bake these into a bar cookie? How would you adjust the recipe? Thank you!
J
Friday, December 8, 2023 at 6:59 amBeautiful! I have 2 of your books and love the pan banging recipes. Where did you find your holly sprinkles? I saw some at Michael’s but the red ones were way too big.
Sarah Kieffer
Friday, December 8, 2023 at 7:04 amHello! These are the holly sprinkles I use.