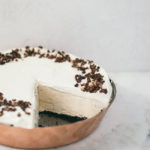
Coffee Caramel Ice Cream Pie
A delicious ice cream pie made with a no-churn coffee ice cream filling inside a chocolate cookie crust. Topped with caramel whipped cream!
Servings 8 servings
Ingredients
Crust
- 200 g chocolate wafer cookies
- 4 tablespoons [57g] unsalted butter
Caramel Whipped Cream
- 2 cups [240g] heavy cream
- 1/2 cup [170g] caramel room temperature
Candied Cacao Nibs
- 4 tablespoons [48g] granulated sugar
- 1 cup [90g] cacao nibs
- 1 teaspoon unsalted butter
Instructions
For the crust
- Adjust an oven rack to the middle of the oven. Preheat the oven to 350°F [180°C].
- Place the cookies in the bowl of a food processor and process until broken down into fine crumbs. Move the crumbs to a medium bowl, and pour the melted butter over the top. Use a spatula to stir together until combined. Press the mixture into the bottom and up the sides of a deep (with at least 2 in [5cm] sides) 9 1/2 or 10 in [24 to 25cm] pie plate and bake for 8 minutes. Remove the pan from the oven and let cool completely.
For the No-Churn Coffee Ice Cream
- Make the ice cream as directed, stopping at the point where you would freeze it. Instead, pour the ice cream into the prepared pie crust and freeze until firm, 6 hours, or covered, up to 4 days. When ready to serve, top with the caramel whipped cream and sprinkle with candied cacao nibs or crushed espresso beans.
For the Caramel Whipped Cream
- In the bowl of a stand mixer fitted with a whisk, stir together the heavy cream and the caramel. Whisk on low for 30 to 45 seconds. Increase the speed to medium and beat 30 to 45 seconds. Increase the speed to high and beat until the cream is smooth, thick, and nearly double in volume, 30 to 60 seconds. The whipped cream can be made 2 hours ahead of time and stored in the refrigerator.
For the Candied Cacao Nibs
- In a wide, heavy-bottomed skillet over medium heat, warm the sugar for a minute, without stirring. Scatter the cacao nibs over the sugar, and leave the pan undisturbed until the sugar begins to melt in spots. With a wooden spoon or silicone spatula, quickly stir the cacao nibs into the liquid sugar, incorporating any unmelted sugar as you go. Once most of the sugar has coated the nibs, remove the pan from the heat and quickly stir in the butter. Immediately scrape the cacao nibs onto the prepared baking sheet, pressing them into an even layer with the back of the spoon or spatula. Allow to cool. Break the cacao nibs into tiny clusters by hand. Store in an airtight container at room temperature for up to 1 month.