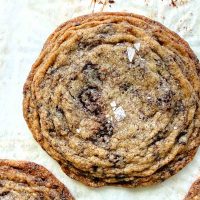
Pan-Banging Brown Butter Chocolate Chip Cookies
These pan-banging chocolate chip cookies are elevated by browning half the butter, giving them an incredible nutty flavor that compliments the chocolate. By dropping the pan on the oven rack, the cookies become gorgeously rippled, giving them crisp edges and the chewiest center!
Equipment
Ingredients
- 1 cup [2 sticks or 227 g] unsalted butter, at room temperature
- 2 cups [284 g] all-purpose flour*
- 1/2 teaspoon baking soda
- 1 1/2 cups [300 g] granulated sugar
- 1/4 cup [50 g] brown sugar
- 3/4 teaspoon fine salt
- 1 large egg
- 2 tablespoons water
- 1 tablespoon pure vanilla extract
- 6 ounces [170 g] semisweet chocolate, chopped into bite-sized pieces
Instructions
- Melt 8 tablespoons [113 g] of the butter in a nonstick skillet over medium heat. Swirl the butter around with a spatula as it melts and starts to bubble. Increase the heat slightly and keep stirring until the butter begins to boil and foam, 3 to 5 minutes. It will smell nutty and you'll start to see little brown bits on the bottom of the pan. Brown the butter until it is golden brown. Pour the butter and all the little brown bits into a bowl, and let the butter sit at room temperature until it is cooled and solidified, see notes.
- Adjust an oven rack to the middle position. Preheat the oven to 350°F. Line 3 baking sheets with aluminum foil, dull side up. Parchment also works, see notes.
- In a bowl, whisk together the flour and baking soda.
- In the bowl of a stand mixer fitted with a paddle, beat the cooled browned butter, the remaining 8 tablespoons butter, granulated and brown sugars, and salt on medium speed, 2 to 3 minutes. Add the egg, water, and vanilla, and mix on low until smooth. Add the flour mixture and mix until combined. Add the chocolate and mix until incorporated. Use a spatula to finish mixing the dough, making sure it is evenly combined and there are no butter or flour streaks on the bottom.
- Form the dough into 3½-ounce (100g) balls (a heaping 1/3 cup each). Place 4 balls an equal distance apart on a prepared pan and transfer to the freezer for 15 minutes before baking. After you put the first baking sheet in the oven, put the second one in the freezer.
- Place the chilled baking sheet in the oven and bake 10 minutes, until the dough has spread and the cookies are puffed slightly in the center. Lift the side of the baking sheet up about 4 inches and let it drop right down against the oven rack (you don't have to remove the pan from the oven to do so), so the edges of the cookies set and the inside falls back down (this will feel wrong, but trust me).
- Close the oven door and after the cookies puff up again in 2 minutes, repeat lifting and dropping the pan. Repeat a few more times to create ridges around the edge of the cookie. Bake 16 to 18 minutes total, until the cookies have spread out and the edges are golden brown but the centers are much lighter and not fully cooked.
- Transfer the baking sheet to a wire rack; let cool completely before removing the cookies from the pan.
Notes
*Throughout my recipes posted on this website, 1 cup of flour equals 142g. Please note that 1 cup of flour can range anywhere from 120g to 142g, depending on the baker or website. I found that after weighting many cups of flour and averaging the total, mine always ended up around this number. Weighing your flour instead of using cup measurements is the surest way to get the result I intended when developing the recipe.
*You can speed up the cooling of the brown butter by placing it in the refrigerator, but you do want it at room temperature when it goes into the mixing bowl, so remember to keep an eye on it.
*You can refrigerate the dough overnight before using. Shape the dough into balls and cover with plastic wrap before chilling, and then bring it to room temperature before baking (when the cookies are chilled solid, they won’t ripple as well). Cookies that spend a night in the fridge will also have a more developed flavor, but also have a bumpier finish.
*These cookies are rather large, but to get the edges to spread out and crinkle, they need to be on the big side. If you want to make the cookies smaller, you won’t get as many ridges on the outer layer, and your center won’t be quite as gooey. They will still be delicious, but not quite what I intended for you.
*Using the dull side of aluminum foil to bake these cookies is a little trick I learned after hearing Alice Medrich speak. The foil helps make for an extra-crisp, golden brown bottom. Parchment paper can also be used with good results.