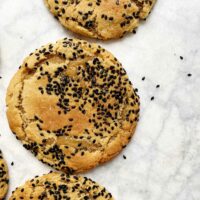
Chewy Brown Sugar Toasted Sesame Cookies
These delicious cookies have crisp edges and a gooey, chewy center with caramel-y notes from the dark brown sugar and a touch of nutty, toasted sesame oil. Rolling them in sesame seeds also adds a lovely crunch. Easy to make, no chilling time required!
Servings 18 cookies
Equipment
Ingredients
- 2 cups [284 g] all-purpose flour
- 1 teaspoon baking powder
- ½ teaspoon baking soda
- 9 tablespoons [126 g] unsalted butter at room temperature
- 1 cup [200 g] dark brown sugar
- ½ cup [100 g] granulated sugar
- ¾ teaspoon salt
- 1 large egg
- 1 large egg yolk
- 1 teaspoon pure vanilla extract
- ½ teaspoon to 1 tablespoon toasted sesame oil see note*
- ½ cup sesame seeds black, white, or a combination, for rolling
- Flaky salt for sprinkling, if desired
Instructions
- Adjust an oven rack to the middle of the oven. Preheat the oven to 400F [200C]. Line two sheet pans with parchment paper.
- In a medium bowl, whisk together the flour, baking powder, and baking soda.
- In the bowl of a stand mixer fitted with a paddle, beat the butter on medium speed until creamy, about 1 minute. Add the dark brown and granulated sugars and salt and beat on medium speed until light and fluffy, 2 to 3 minutes. Scrape down the sides of the bowl, add the egg, yolk, vanilla, and sesame oil and mix until smooth. Add the flour mixture and beat on low speed until just combined. Use a rubber spatula to give the dough a final mix and make sure it is completely combined.
- Form the dough into balls, about 2 tablespoons each [50 g], and roll into the sesame seeds, covering the whole ball of dough. Place 8 cookies on each sheet pan. Sprinkle each cookie with a little flaky salt, if desired.
- Bake one pan at a time, rotating halfway through baking. Bake the cookies until the tops are golden brown and the cookies are slightly puffed and starting to crinkle, 9 to 11 minutes. Remove the baking sheet from the oven and use the back of a spatula to gently press the top of each cookie to flatten it. Let the cookies rest on the sheet pan for 5 minutes, then transfer them to a wire rack to finish cooling.
- Cookies are best slightly warm but can be stored in an airtight container at room temperature for up to three days. Cookies will soften the longer they sit. Cookie dough can be formed and refrigerated overnight, then baked the next day; the cookies may need an extra minute if chilled. Cookie dough can also be formed into balls and frozen for up to 2 weeks; let the cookies sit out at room temperature until the oven preheats. The cookies will need an extra minute if baked frozen.
Notes
- I love an entire tablespoon of toasted sesame oil in my cookies, but if you haven’t baked with it before you may want to start with a smaller amount and gradually add more; some people find the oil overpowering.
- Light brown sugar will work here if you do not have dark brown sugar, however, the cookies will turn out different. Dark brown sugar has more molasses in it, which gives a deeper flavor (think caramel undertones) to the cookies. It will also give the cookies a darker color.
- I have not had trouble with the bottoms browning too much, but a few people have. Something to note: using an oven thermometer to check the temperature of your oven can be helpful; many ovens are off by up to 25 degrees (mine included). If your oven runs hot, you can bake a single cookie first to see how it turns out. If the bottom is too dark for your liking, you can stack two sheet pans on top of each other and bake the cookies on them to slow down browning.
- I prefer to sprinkle the flaky salt on the tops of the cookies before baking vs after - I think that it helps bring out more flavor without tasting overwhelmingly salty.
- Throughout my recipes posted on this website, 1 cup of flour equals 142g. Please note that 1 cup of flour can range anywhere from 120g to 142g, depending on the baker or website. I found that after weighting many cups of flour and averaging the total, mine always ended up around this number. If I am posting a recipe from another cookbook, I will use whatever gram measure of flour used in that book, which is why you may see a few posts with a different cup measurement. Different brands of flour have varying levels of protein, ranging from low to high, which can result in very different outcomes when baking. I’ve found Gold Medal all-purpose unbleached flour to be the best option for many of my recipes; I use it in all the baked goods that don’t use yeast. For yeasted doughs that call for all-purpose flour, I like to use King Arthur Brand. If you are using White Lily flour, please note that it is a low protein flour and doesn’t absorb liquid the same as regular all-purpose flours. Check the back of the flour bag for instructions on substituting it for regular all-purpose flours.